 Thambaru, who is a friend of mine recently bought an Android phone and asked me what should be the first things he do with it in order to prepare the phone for his use. So, I thought why shouldn’t I write a blogpost on that topic, so I can share my experience of Android. The phone I am currently using is my first Android, so this post would be in a newbie’s point of view, which I think, will make this post more relevant to people who really has the need of a resource like this.
 Note: I will include detailed step-by-step guidance in the second section called “Transfer your contacts to Google Account”, so that you can familiarize with some jargon and basic navigation in Android OS. After that, I’ll provide some basic guidance. So, if you are completely new to the OS, I recommend reading that even though you are looking for some other specific information.
 Disclaimer: I use a Huawei IDEOS X3 U8510 with Android 2.3.4 Gingerbread, so all the guideline are based on that phone and OS. I am no expert regarding Android. The purpose of this blogpost is just to share my experience with the OS so that someone will find this helpful in some manner. I have personally done all the mentioned activities upon my phone without doing any harm to it. However, as I have no control over Android, any of the apps mentioned and user’s activities, I bear no responsibility over any harm done to a phone or any super-natural power gained by user by following guidance in this blogpost.
Just to be sure, if some guy in a uniform asks, I do not exist.
1. Connect your Google account with your phone.
![]()
![]() Android is a Google product, well, not completely (Open Handset Alliance is the patron of Android), but Google is the one controlling most of it. So, for the most part, you can call it a Google product. To enjoy all the features your Android got, you must link your Google account with your phone.
Android is a Google product, well, not completely (Open Handset Alliance is the patron of Android), but Google is the one controlling most of it. So, for the most part, you can call it a Google product. To enjoy all the features your Android got, you must link your Google account with your phone.
If you don’t have a Google account, you shouldn’t be bothering to have a smart-phone with Android as the OS of it.
2. Transfer your contacts to Google Account.
 All the contacts in your Google Contacts will be available from your phone once you successfully link your Google Account and your phone’s OS.
To transfer contacts from your old phone, you can either go to Google Contacts web interface and type in all the contacts you need with the convenience of using your PC. Or you can transfer your contacts from the old phone to a SIM, then insert that SIM to your new Android phone and finally copy contacts in the SIM to your Google Contacts.
This is how to copy contacts:
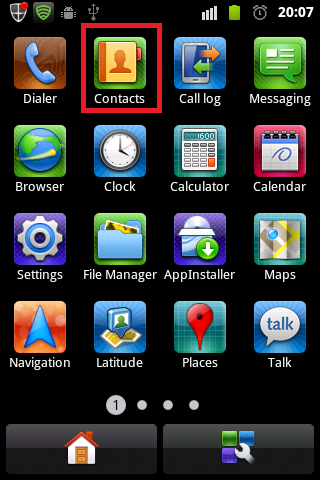
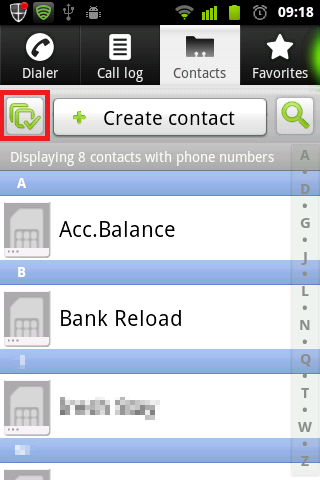
1. Make sure you have copied your contacts to the SIM from old phone, and then insert the SIM to new phone. Press/tap (“Tap” = Touch a certain spot of your phone’s screen once.) your “Home Button” (Phone’s manual will tell you what that is, if you are having trouble identifying this.) and make sure you are in the “Homescreen” (Android counterpart of “desktop” of a PC OS.). Then tap the launcher button.
Following image shows my phone’s homescreen. Launcher button is highlighted.

2. Then search for the icon labeled “Contacts” in the launcher screen.
Following image shows one page from my phone’s launcher. Contacts icon is highlighted.
3. By tapping that icon, you will open the Contacts app. It’ll look like this:
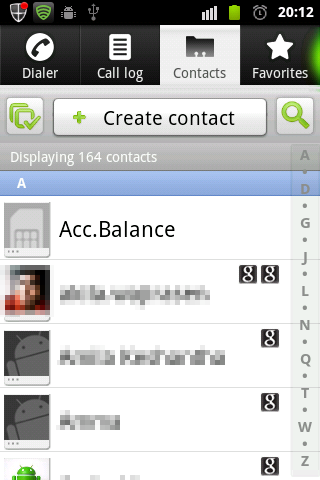
4. Once you are there, press/tap your “Menu Button”. It’ll cause a menu like this appear on your screen:
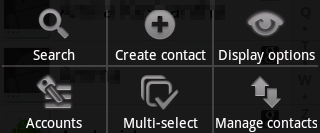
5. Tap the option called “Display options”, and you’ll be presented with a screen like this:
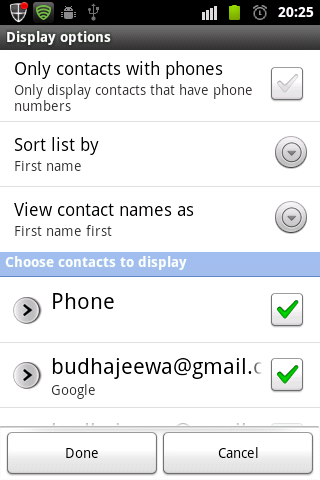
6. Scroll (Tap and drag) the screen towards top, so you see the bottom. Make sure you see all the options under the section labeled “Choose contacts to display”.
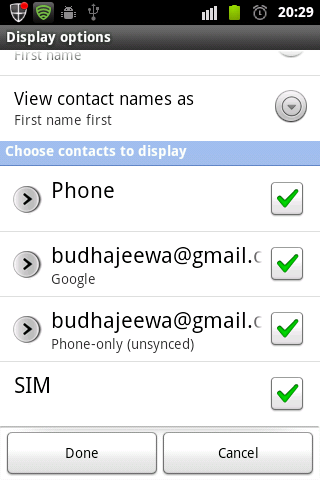
7. Uncheck all the options except “SIM”.
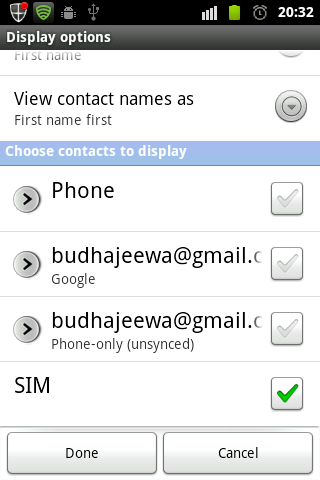
8. Tap “Done” button and you’ll be presented with the previous screen, but this time only with the contacts stored in the SIM.
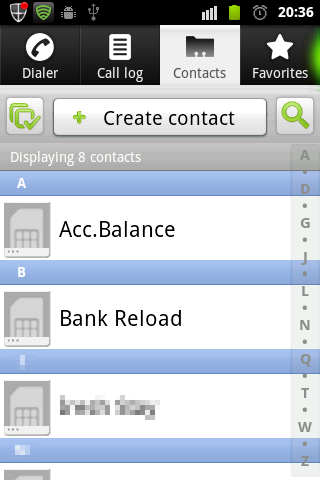
9. Long tap on one of the contacts and it’ll show a menu like following.
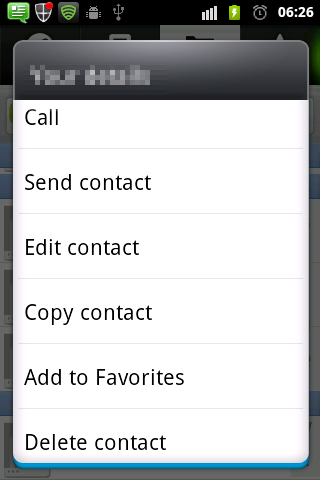
10. Select “Copy contact” and it’ll give you another menu like this:
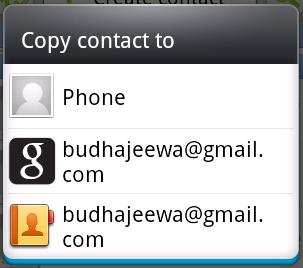
11. In that menu you got three options.
First: “Phone” – If you select this option, the contact will be saved in your phone’s internal memory. This won’t be available in Google Contacts web interface. This will remain in the phone even if you unlink your Google Account and your phone.
Second: Your GMail address with black “g” icon – If you select this, the contact will be saved in your Google Contacts. This will be available from Google Contacts web interface. This will be lost if you unlink your Google Account and your phone.
Third: Your GMail address with phone book icon – If you select this, the contact will be saved in Google Contacts. This won’t be available in Google Contacts web interface. This will be lost if you unlink your Google Account and your phone.
I use and recommend the second method. You’ll be able to use your contact details anywhere Internet is available that way.
12. Once you have copied the contacts from SIM to another location, you can delete the contacts from the SIM. That will allow you to add more contact details to the same SIM from old phone and transfer those as well to the new phone while making sure you are not making duplicates. This is useful as SIMs only allow 200+ contacts to be saved on it.
To delete contacts from SIM, tap the highlighted button in the following screenshot:
13. Once you tap that, you’ll be presented with a screen like below:

14. Tap “Select all” and then tap “Delete”. It’ll pop up a message box like following:
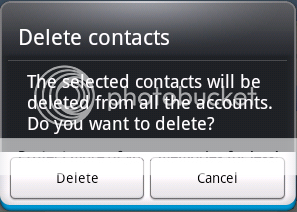
15. Tap “Delete” and every contact in SIM will be deleted. You can repeat above steps if you have more contacts in the old phone that you need to get to your new Android phone.
3. Select a basic one for Home Screen animation.
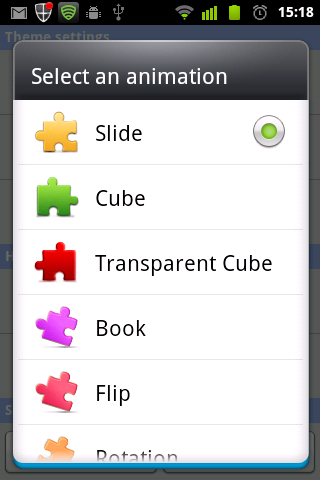
If you are not an owner of an Android device with cutting edge technology and performance, you should be worrying about the actual use of your phone, not eye-candy. Setting a basic animation for home screen transitions will save battery and processing power for things that actually matter.
Go to Home Screen, press Menu, tap “Home settings”, tap “Animation” under “Home settings” section, and select a basic animation like “Slide”.
4. Set number of Home Screens to a minimum.
Android allows you to have number of home screens. You can fill these with fancy widgets and shortcuts. However, this also consume battery and processing power. I am only using one home screen and there are very little number of shortcuts. I didn’t find any widget useful to me, so I have a clean homescreen.
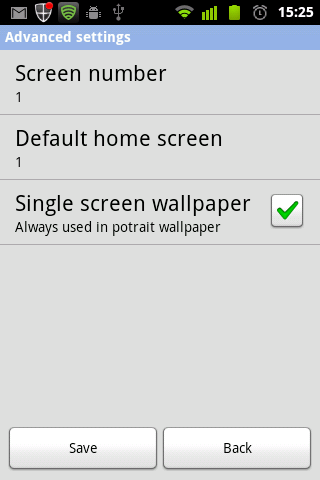
Go to Home Screen, press Menu, tap “Home Settings”, tap “Advanced settings” under “Home settings”. That will take you to another screen. From there, tap on “Screen number” and select a minimum amount.
If you have more than one home screens, you can set one of them as the default screen by tapping “Default home screen”.
5. Set shortcut buttons to commonly used options.
Although they are like mini PCs, Android smart-phones are… well… phones. You use it to make and receive calls and text messages.
So, we should set those two as our shortcut buttons.
Here, I am talking about the buttons in the below screenshot:

You can see I have already set them for calling and messaging. However, if your phone has something else, go to Home Screen, press “Menu”, tap “Home settings”, tap “Left shortcut” and select the option you need.
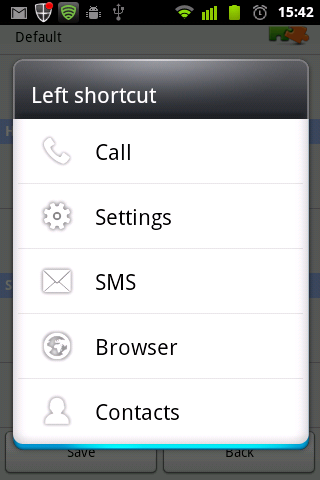
Do the same for “Right Short”.
6. Use only 2G networks.
Unless you are heavily using data over your mobile connection, you can easily switch to 2G only mode. You can use voice and text services without any difference while saving battery.
Go to Home Screen, press Menu, tap “Settings”, tap “Wireless & networks”, tap “Mobile networks” (You’ll have to scroll to bottom to see that option.), check “Use only 2G networks”.

7. Customize sound settings to the best.
Make sure you pay attention to your phone when it’s required.
Home Screen → Menu → Settings → Sound.
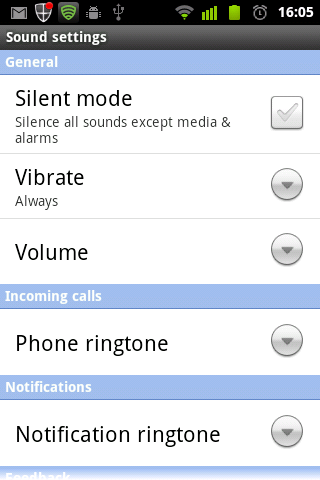
1. Set “Vibrate” to “Always”, so you won’t miss an important call when you are in a loud bus.
2. Tap “Volume” and you’ll see this screen:
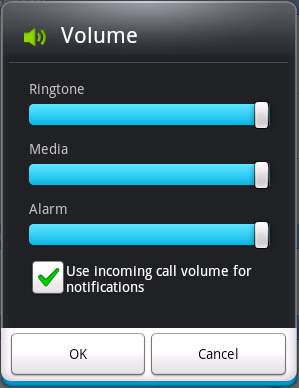
Set “Ringtone” and “Alarm” to the max. Set “Media” as you wish. It is good to check “Use incoming call volume for notifications”, so you hear the notification sound in the maximum volume too. Plus notification sound will always mirror the ringtone volume.
You can always use the Volume Rocker while the phone is in standby mode to adjust the ringtone volume. The rocker will affect the media volume if used while a media file is playing.
3. At the bottom of the “Sound settings” screen, you’ll see options like “Audible touch tones”, “Audible selection”, “Screen lock sounds”, “Haptic feedback”. They are just useless and eat battery.
8. Fine tune display settings.
Screen has the ability to drain the battery very fast, we have the ability to tame it.
Home Screen → Settings → Display.
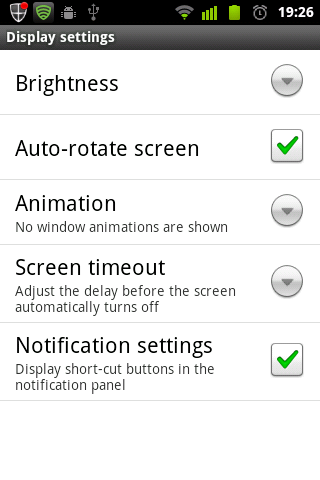
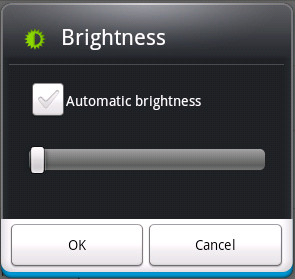
1. Set “Brightness” to the lowest. Uncheck “Automatic brightness”. You will get used to the low brightness level no problem, and when you are in bright sunlight, you can just go to a shade and see your screen.
2. Set “Animation” to “No animation”.
3. Set “Screen timeout” to “15 seconds”. It’s the lowest available.
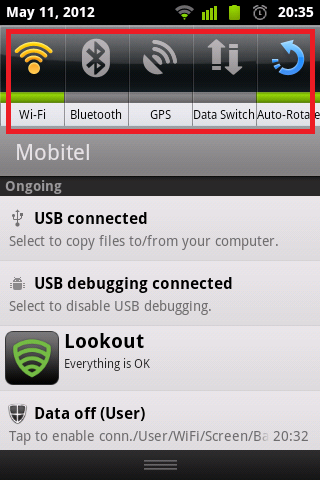
4. Check “Notification settings”. It’ll display bunch of useful shortcuts in the notification area, like this:
9. Set SD card as the preferred install location.
You can install most of the apps in SD card, instead of the phone memory. Use phone memory for important apps that you would need all the time, eg., security apps, utilities etc.
Home Screen → Menu → Settings → Applications.
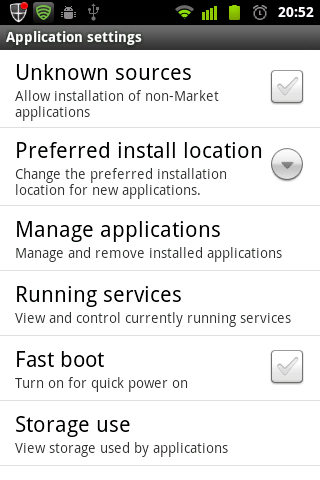
Tap “Preferred install location” and select “Removable SD card”.
10. Install these utility apps.
These apps will help you better manage your Android device.
 1. Watchdog Task Manager Lite.
This app monitors other apps’ CPU usage and notifies you about excessive CPU usage of any app. This will help you maintain your phone’s performance.
https://play.google.com/store/apps/details?id=com.zomut.watchdoglite
 2. JuiceDefender – battery saver
This app limits battery consuming of processes while they aren’t being used. This has couple of paid editions, but I have only used the free edition yet. Looks to me it is working.
https://play.google.com/store/apps/details?id=com.latedroid.juicedefender
 3. Apps 2 SD (Move app 2 sd)
This app will provide you with features to move apps from phone to SD. This app automatically tells you whether a newly installed app can be moved to SD card. It is a good idea to have all the non essential apps in the SD.
https://play.google.com/store/apps/details?id=com.IQBS.android.app2sd
 4. Lookout Security & Antivirus
This is a security app you must have. This can scan other apps for malware. Have features to help you find your phone in case you lost it somewhere.
https://play.google.com/store/apps/details?id=com.lookout
 5. Titanium Backup ★ root.
This help you to back up your system. Pro version has the ability to freeze apps. Freezed apps are completely like unistalled apps, nothing of them work, but they aren’t uninstalled. You can defrost them any time. Good to keep away factory installed apps that you are not sure whether you should uninstall or not.
https://play.google.com/store/apps/details?id=com.keramidas.TitaniumBackup
What have I missed?
I am sure I have missed a lot of stuff and this is an incomplete list. How do you prepare your Android for your personal use?
14 responses to “Must do’s for new Androids”
Thanks bro! you’ve resolved my burning question in these days. 😀
Welcome bro! I am waiting to see a blog post from you about your phone.
Awesome stuff bro 🙂 Thanks for the write up.
Thanks for the comment bro! 🙂
Thanks for the info. I liked knowing my phone whit out a guide.But reading your page is fun and i learn as well.
A truly definitive blog post and you talk a lot about saving battery power. This is my biggest proble. Had not thought of going back to 2G
Going 2G definitely helps.
I don’t have an android yet but when I will, this article will be very usefull!
My phone runs out of power a lot as soon as I am on great sites, and gets hot but you have covers power problems in your post and how to save the power very good information
Thanks for explaining the connectivity, sometimes that confuses me but you have done a marvelous job here thank you
Reading some of the posts from mutual friends it would appear that you have worked a nice way to deal with power source.
Enjoy
Bill (e)BIS
Excellent Blog….very informative and detailed….Thanks for sharing!
How can you see what widgets are installed on the X3?
Long tap home screen -> Add Widget
You can see a list of installed widgets there.